|
 |
|
|
PREVIOUS
|
|
ANGLE GAGE BLOCK HEADER PAGE
|
|
|
|
|
|
Measuring Angle Gage Blocks & True Squares
|
|
|
|
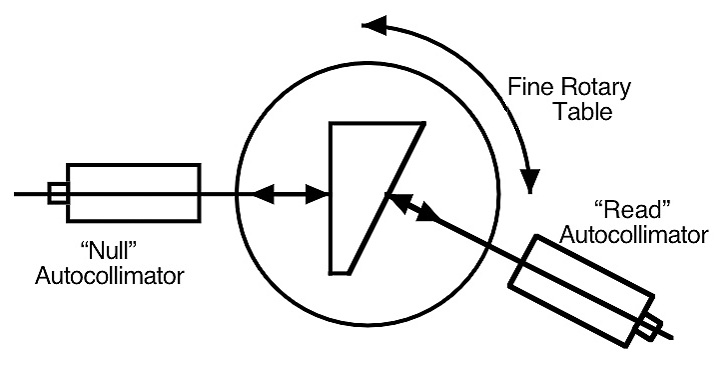
At Webber, we calibrate angle gage blocks by comparison to a master angle
gage block.  The comparison is done by using two autocollimators and a rotary
table with a very fine adjustment.
|
|
|
|
 |
|
|
|
1)  A reference block of the same nominal angle as the block to be measured is placed
      on a flat platen which is mounted on a rotary table with a very fine adjustment.
2)  The two autocollimators are positioned to view the base and hypotenuse of the
      master angle block.
3)  The base of the reference block is "zeroed" in the "null" autocollimator by adjusting
      the rotary table.
4)  The reading of the "read" autocollimator is recorded for the master block.
5)  The test block is substituted for the master block on the platen.  The positions of the
      autocollimators are not moved once set in Step 2.
6)  The rotary table is adjusted until the null autocollimator reads zero for the test block.
      This brings the base of the test block into the same position as the base of the
      master block in Step 3.
7)  The reading of the "read" autocollimator is recorded for the test block.
|
|
|
Deviation of Test Block = x - r + c
    where x = recorded reading of the test block from the "read" autocollimator
               r = recorded reading of the master block from the "read" autocollimator
               c = known calibrated deviation or error the master block
|
|
Click to View Sources of Measurement Error
|
|
|
|
|
|
|
|
PREVIOUS
|
|
ANGLE GAGE BLOCK HEADER PAGE
|
|
|
AG30
|
|
©2018, Webber Gage Division, The L. S. Starrett Co, Westlake, Ohio , 44145
|
|
|
|
|
|
|
|
|
|
|
|
|
|
|
|
|
|
|
|
|
|
|
|
|
|
|
|
|
